Technical steps to start out a: Realistic City
NOTE: JAVA
IN SHORT:
- Settle on what terrain you’ll use: You’ll want flat areas, water access.
- Plan (draw!) the general layout: City zoning, roads, transport, ports.
- Pick locations for the landmarks and city services your people need.
- Choose the preferred platform like singleplayer, local server, server!
- I cannot recommend https://www.pureref.com/ enough for references (or Anim-Ref add-on)
- Related: WEEKLY NEWSLETTER (Dec 01): Catching up on Creative Servers! (From the Blog)
PART I – PLATFORM, TERRAIN, CITY PLAN

You have two options: Go straight into it, free-style building and experimenting whenever you feel like it. Or, plan everything down rigidly to the last detail. A lot of people choose to plan, as is probably preferred.
In other words: If you’re here for the long run and planning to make a huge project, follow the tips below!
A) Where do you wish to build?
- Single-player: The easiest, but this may have some dis-advantages: Lack of community (You cannot get feedback from other players and/or collaborate easily). Lack of plugins (Some plugins like Dynmap, Builders Utilities and Arceon are incredibly useful, server-side-only building tools). However, you retain full control over the world at all times on your local machine (BACK IT UP!)
- ⭐Join a pre-existing server: I’m biased and recommend Builder’s Refuge, who recently migrated to 1.20. If you get promoted with a portfolio or a build you make on their server, you unlock Member worlds and can create a new flat world or upload any terrain and work away, alone or together, with free access to Dynmaps, the paid Arceon plugin, and more. They actually have an instant world AND schematic upload/download GUIs!
- ⭐Local host: Merging single-player with server. This refers to installing a server like Spigot on your computer, turning it on when you want to play, and connecting using your IP address. The installation is pretty easy, but never the less you will need to manage the files yourself, for things like server configs or adding plugins. You can port forward your IP to allow others to join. I recommend this option if you prefer working local but still need the server-side plugins!
- Aternos or paid hosting: This option is like local host, but with the possibility of better server specs and some limitations. Aternos offers free, very basic, ad-funded servers that stay online as long as you stay online. I tried them myself in the past and worked as advertised. However, if you want a proper server with it’s own IP, better specs and more, and can afford to pay for hosting – feel free to do it. This option is ideal for creating a massive city project with a build team as you will be able to do big World Edit operations fast and have 24/7 access.
B) What terrain should you start in?
- Default Minecraft terrain – come on! No one does that for realistic cities. But if you would like a challenge, feel free to blend your city into the mountains and valleys of Minecraft’s terrain…
- Flat world – The classic go-to choice. It allows for a quick and easy head-start and infinite space! The only reason I’d stay away from this is if you would like to start adding terrain features like a port and ocean, rivers, mountains. And you probably do – these will be tough/slow to build later in-game.
- ⭐Custom made or downloaded terrain – This is my personal choice. You get a custom terrain from World Painter or World Machine (99% of the time it’s an island), with a pre-made flat area surrounded by hills, ocean etc. You could even import real life terrain in-game! The only downside is size – you might either constrain yourself too much, or do the opposite and let an over-ambitious terrain control you. However, with some planning it should be OK.
- ⭐Ocean flat world – This is an interesting choice I’ve seen 2-3 builders make! It attempts to merge the flat world with the issue of having to do man-made oceans. If you’re fine with making your own mountains, you now start your city floating over an infinite ocean and expand freely outwards, only building down to the seabed in the rivers and shores of your city.
glumia offers some neat pre-made terrains and I offer this 4k map.
C) Planning your city – considerations:
- Make a rough drawing and/or moodboard: Is your city in a mountain valley or on an island? What are the main terrain features? Where will the different city areas go? Will your city be a compact area, or spread out in multiple strips?
- Make a detailed map for your city: Or a part of it. Plan some main roads – typically, this means a ring road highway encircling your city or cutting through, and all smaller roads around. Maybe you want fancy patterns or landscaping? Look up what landmarks/services a city should have, and plan out their places. For example, make a main government district near the center. Have fire/police/health services in an accessible location. Schools? Malls? Libraries? Everything?!
- ⭐Document all info/lore if it helps: If you’re planning to make a detailed city plan backed up by lore, notes and to-do lists, start a document for that just for your project.
- ⭐Make important stylistic choices early: Specifically: Will you have interiors? (I recommend doing an empty, lit up layout as a middle ground between achieving some depth/realism but not going insane furnishing). Will you be filling your streets (or waters and skies) with vehicles? (I recommend deciding on a fitting scale and getting free-to-use vehicle packs. Hint hint, I have multiple free, detailed vehicle packs available MegaMinerDL’s Vehicle Pack | Content on Planet Minecraft)
Example landmarks: Full size mall, library, News HQ, police, fire, hospital, Prison, factories, power station, lighthouse, city hall, School, club, amusement pier, stadium, convention hall, security agency, hotels.. (Also university, theatre, opera house, amphitheater.)
PART II – PRACTICAL BUILD TIPS, INSPIRATION

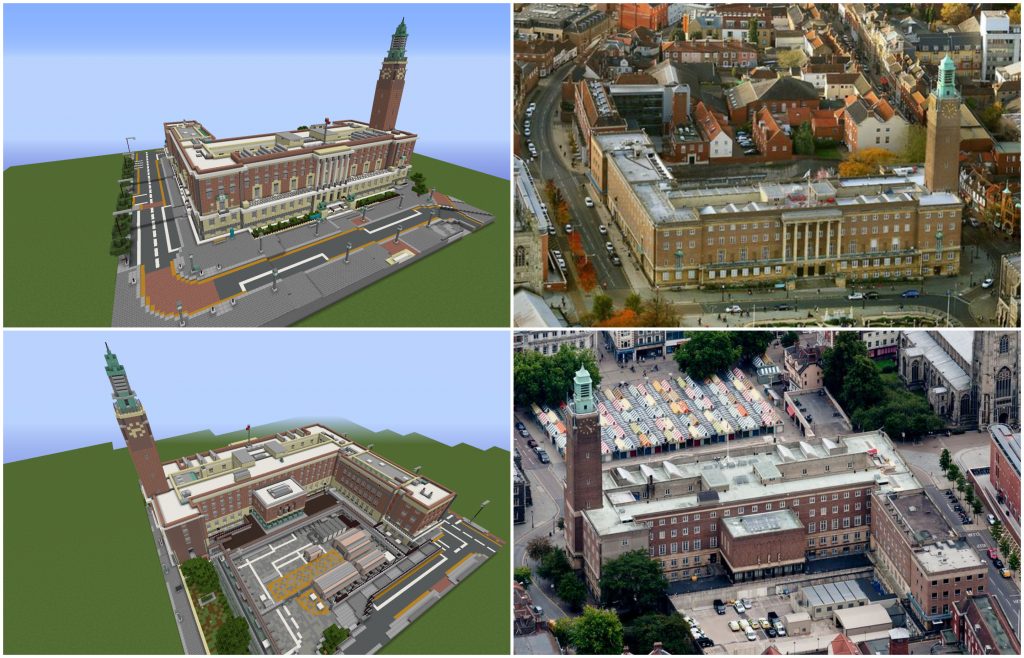
If you run out of inspiration, step back from the project until motivation comes back. The best inspiration is spontaneous – seeing something and instantly wanting to come on and build! Above: Norwich City Hall
For true realism, get inspired by architectural websites, or even things like a road planning law PDF!
A) The Build Process series of tutorials:
- The Build Process Part 1 | Make better city buildings – PREMIUM MINECRAFT BLOG
- The Build Process Part 2 | Building realistic interiors – PREMIUM MINECRAFT BLOG
- The Build Process Part 3 | City planning and districts – PREMIUM MINECRAFT BLOG
B) Tips and tricks for city building:
- Quick tutorial: Instant modern pavements/urban parks World Edit – PREMIUM MINECRAFT BLOG
- Why I DON’T add depth to my buildings: A case for Modern Builders – PREMIUM MINECRAFT BLOG
- Incorporate circles into your Minecraft city: why and how. (Modern) – PREMIUM MINECRAFT BLOG
- CITY BUILDING TIPS from a “pro” – Skyscraper non-tutorial, roads – PREMIUM MINECRAFT BLOG
- Reflections on REALISM city building / Skyscraper contest / Textures – PREMIUM MINECRAFT BLOG
- Building reality: A look through the eyes of Minecraft architects – PREMIUM MINECRAFT BLOG
C) Inspiration images, links, dynmaps:

No comments yet.